This tutorial gives an overview on how to rotate a particle in different ways.
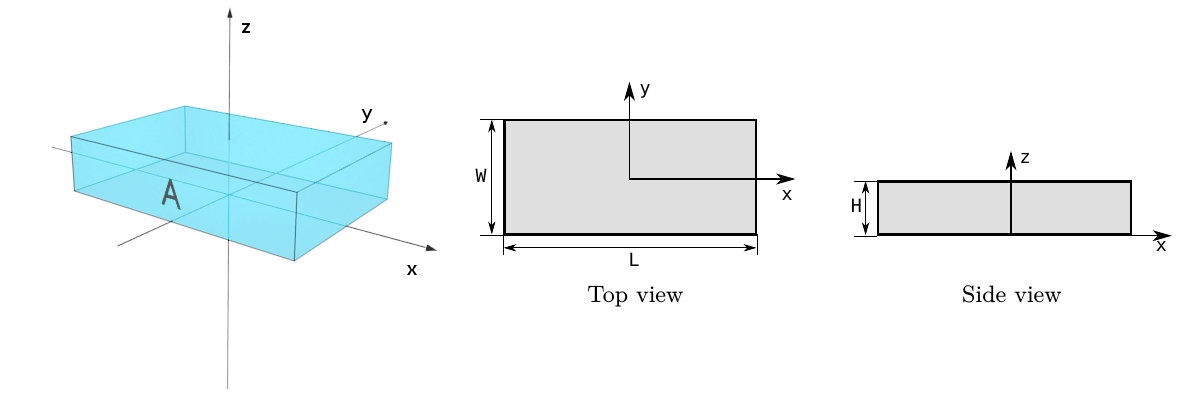
The rotation of particles starts from a known standard orientation. This orientation is represented by the motionless reference coordinate system of the particle and it is defined in the User Manual. In this tutorial we are going to use a box shaped particle with defined length, width and height. The picture below represents the initial orientation of the box shape. For all implemented shapes, please refer to the User Manual (section “Particle form factors”).
The following code will create a box particle of 30 nm x 20 nm x 6 nm size made of a material
whose refractive index roughly corresponds to silver at 1 Angstrom wavelength.
length, width, height = 30.0*nanometer, 20.0*nanometer, 6.0*nanometer
material = HomogeneousMaterial("Ag", 1.245e-5, 5.419e-7)
particle = Particle(material, FormFactorBox(length, width, height))
There are 4 rotation classes in BornAgain:
# sequence of three rotations following Euler angles notation
RotationEuler(alpha, beta, gamma)

# rotation around X axis by given angle
RotationX(angle)

# rotation around Y axis by given angle
RotationY(angle)

# rotation around Z axis by given angle
RotationZ(angle)
By default all angles are expressed in radians.
Euler Angles
alpha, beta, gamma are the Euler angles describing a rotation composed
of three elemental rotations.
The object is first rotated by alpha about the z axis.
The coordinate axis, rotated along with the object, shall be denoted by a prime:
z'=z, while x',y' differ from x,y.
The second rotation is by beta about the x' axis.
The coordinate axis, rotated along, are now denoted by a double prime.
The third rotation is by gamma about the z'' axis.
This choice of Euler angles is commonly denoted as the z-x'-z'' convention,
or z-x-z for short.
To set the rotation, use the following constructor
# non rotated box
particle = Particle(material, FormFactorBox(30, 20, 6))

# box rotated around X by 90. degrees
particle = Particle(material, FormFactorBox(30, 20, 6), RotationX(90.*degree))

# box rotated around Y by 90. degrees
particle = Particle(material, FormFactorBox(30, 20, 6), RotationY(90.*degree))

# box rotated around Z by 90. degrees
particle = Particle(material, FormFactorBox(30, 20, 6), RotationZ(90.*degree))
The following plot shows the reference box at the top as well as the 3 rotated boxes at the bottom
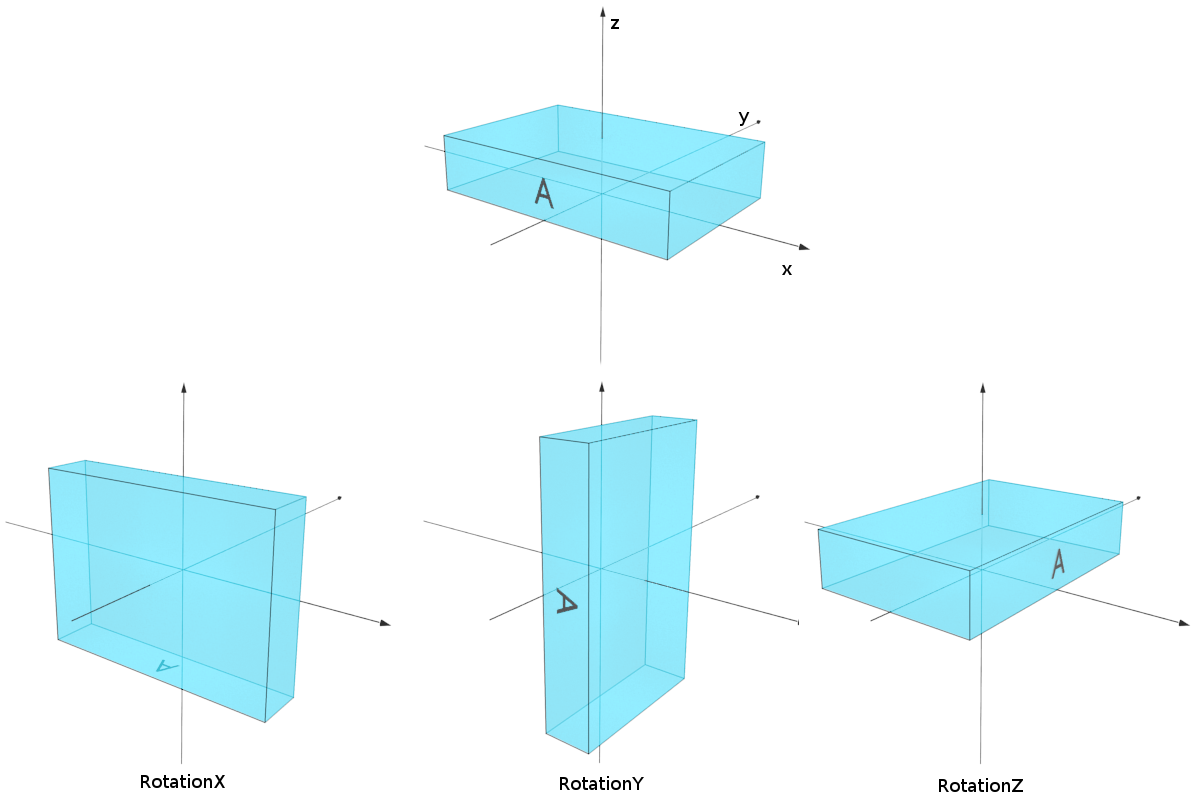
Please note, that the rotation doesn’t change the reference coordinate system of the box. The initial box reference point stays in the same place. This has to be taken into account when positioning of the rotated particle (see below).
There are other ways of defining the rotation of a particle: via the particle’s own methods and/or via a particle layout.
In the following code snippet we set the rotation of the particle using the particle’s setRotation
method, then we apply an additional rotation via the particle’s
rotate method and finally we add the resulting object to the layout.
particle = Particle(material, formfactor)

# sets initial rotation of the particle
particle.setRotation(RotationZ(90*degree))

# applies additional rotation on top of existing one
particle.rotate(RotationY(90.0*degree))

layout.addParticle(particle, 1.0, kvector_t(0,0,0))
The following code snippet is equivalent to the previous one. We again set the initial rotation of the particle, and then we apply the additional rotation while adding the particle to the layout.
particle = Particle(material, formfactor)

# sets initial rotation of the particle
particle.setRotation(RotationZ(90*degree))

# adding particle to the layout with the additional rotation specified
layout.addParticle(particle, 1.0, kvector_t(0,0,0), RotationY(90.0*degree))
Consider a two-layer system (air, substrate) with a box shaped nanoparticle sitting in the air layer right on top of the interface:
box = Particle(particle_material, FormFactorBox(30., 20., 6.))

layout = ParticleLayout()
layout.addParticle(box, 1, kvector_t(0, 0, 0))

air_layer = Layer(layer_material)
air_layer.addLayout(layout)
substrate_layer = Layer(substrate_material)

multilayer = MultiLayer()
multilayer.addLayer(air_layer)
multilayer.addLayer(substrate_layer)
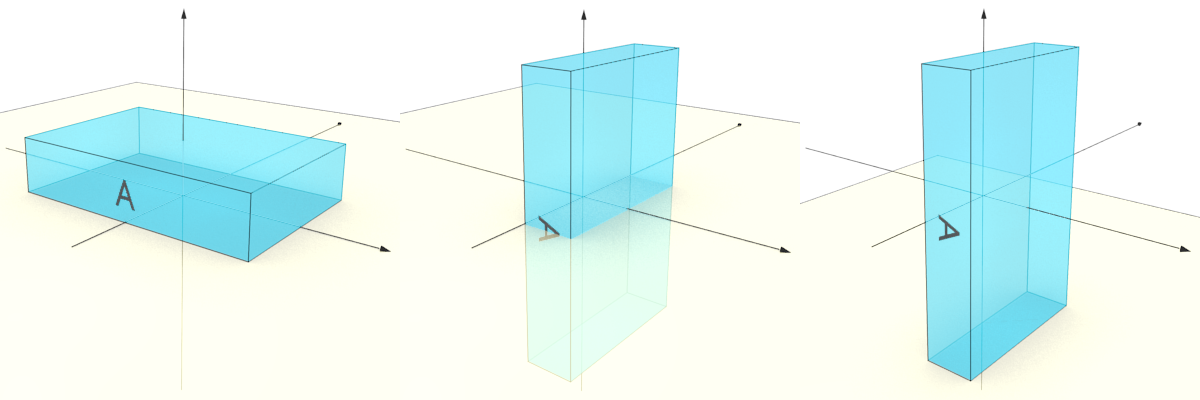
Suppose that you have decided to transform your box into a tower-like shape by
rotating it by 90 degrees about the Y axis.
In this case it is important to have in mind that the rotation of the box doesn’t change the reference point of the box.
In the plot below 3 different cases are illustrated.
# box on the left
layout.addParticle(box, 1, kvector_t(0, 0, 0))

# box at the center
layout.addParticle(box, 1, kvector_t(0, 0, 0), RotationY(90.*degree))

# box on the right
layout.addParticle(box, 1, kvector_t(0, 0, 30.0/2.), RotationY(90.*degree))
The box on the left was added without specifying any rotation. The reference point of the box is not shifted with respect to the layer coordinate system. This setup is valid.
The box on the left was added without specifying any rotation. The reference point of the box is not shifted with respect to the layer coordinate system. This setup is valid.
The box at the center was added with an extra rotation specified. As a result, the particle has turned with respect to its reference point and now crosses the interface. This means that the setup has become invalid as particles can not cross interfaces.
The box on the right was added with rotation and position specified. The position defines the location of box’s reference point with respect to the coordinate system of the layer. The setup is again valid and the box has become a tower.
Of course, in this artificial example there is no need to create a box, then rotate it and finally shift it to get just another box. It is easier to directly create a tower as a box with the following set of dimensions (6 nm, 20 nm, 30 nm). In following tutorials we will show how to compose particles into complex shapes (e.g. box consisting from different materials), where such rotations will be necessary.